Showing posts with label Guest Room. Show all posts

Sunday, April 3, 2011

Make Your Own Headboard

Our guest bedroom was in serious need of something. It could fulfill it's purpose (to house guests in comfort and safety) and included a bed, some reading lights, and even a twenty-five year old television to entertain! But it was begging for some pizzazz, some character, something to make it feel like the main, loved guest room. We, lacking funds, decided to placate the bedroom's demands by making it a headboard. And hallelujah was that bedroom right! All of a sudden it went from a mud brown box to a cozy, colorful pad. What's even better, it didn't take much time, money, or effort to get it there.

Clearly the bed is the main focus of a bedroom. And as the star it totally deserves to be snazzed up a bit! But looking through catalogue after catalogue, one can easily be discouraged after falling in love with one $800+ bed frame after another. There is a new (or maybe revitalized?) trend for upholstered headboards which we love, but we never could find all the reasons to spend our extra dough on one. And then we found DIY directions to make one at home. They claim the project to be fast, economical, and easy to do, and by golly, we are here to support that claim. The basic directions we used can be found here from YoungHouseLove.com, home of two of the best DIYers we've found. We did have to finagle theirs a bit from lack of motivation to find all parts (such as the canvas stretching frame) and a desire to save some money.

So the following is our how-to on making a DIY headboard:

Tools: Saw, Screwdriver, Hammer
Supplies: 3- 72" 1x2 finished pine boards, 4 right angle fasteners, screws, tacks, sandpaper, fabric measured to fit with extra for sides, 1 bag of extra thick batting
Time: 1-2 hours

1. Measure the bed's length and height. We decided to make the frame 36" x 66". That left about 26" above the mattress and a few inches on both sides to anchor the look.

2. Make the frame. Cut 1 board into 2- 36"halves and cut the other 2 down to 66" each. Cut 45 degree angles onto all ends, making sure they correspond appropriately with one another. Peyton marked the ends by numbers to correspond each joint. Sand them down to meet flush at a right angle. Attach with screws using the right angle fasteners.

At first we tried those wave frame connectors but without a jig to hold the pieces forcefully together they didn't work. You can see Peyton's markings here though. 
The right angle fastener.

3. Attach the batting and fabric. Stretch the batting over the frame (we doubled it over since we had extra) and attach using tacks or staple gun if handy. It helps to have another person hold the opposite end tight so there isn't slack. Attach one side, move to opposite, and repeat. Once batting is secure attach fabric in same way. We trimmed down the corners a bit once we got there and tried some different folds to figure the best looking way to attach them.


4. Make your bed a happy camper. Add the glitz it's looking for! Since the headboard is so light, if the bed is against the wall you can simply add some nails to the wall and hang it like a frame.


**It was tougher for us because we have it against a window. Peyton simply nailed two more boards to the back, one each right and left of center, that went almost to the floor. He then screwed two thicker 2x4 pieces below the windowsill and attached the boards to that. This way it was secure to the wall and got past the lip of the windowsill.
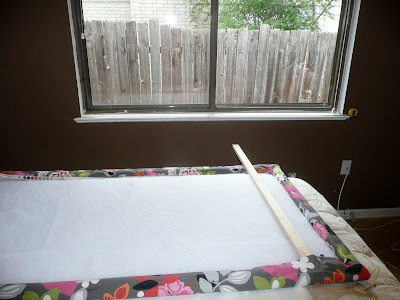
One of the supports that Peyton added to attach to wall.

**Another way, that we should have used since we can't hang ours, is to use plywood. Do the same steps for attaching, but since it is a sheet of wood it will be heavier and will have to be attached to the wall similar to ours.


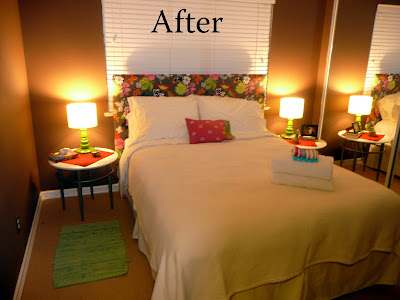
So there you have it! Our first official step into the DIY realm completed. And we are tickled pink with the results. Let's take a look at the before and after.


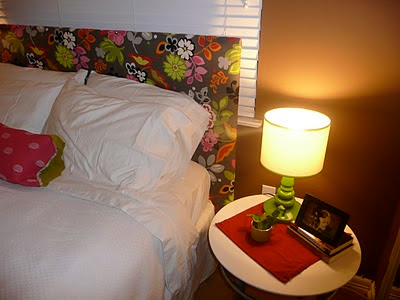
The whole room seems to have a focus now. The colors and pattern make it become artwork for the room and leave lots of options open for accessories. It's crisp and fun all at once! The fabric just begs to have small splashes of its colors around the room. We love the little green lights we got from Target and finally get to show off an adorable pillow case that my grandmother made years ago with little white hedgehogs on a red background. Lots more to do in there (like hang curtains, art, make a chest for the foot of the bed) but what a huge improvement already. It just showed us that you CAN fix up your house on a budget. Fun times await!


LIVE THE MURRAYED LIFE

Wednesday, March 16, 2011

Hello Hipsters!

And welcome to South By South West week in the good old Austin, Texas! For those of you who don't know about this special time, let me explain. South By South West is a huge yearly festival held in Austin that has sections for interactive, film, and music. It lasts about two weeks and brings thousands upon thousands of people to this place of warmth, technology, and lots and lots of noise. I call it noise because with this many crowds, and the vast variety of music, that's what it becomes. It's talking everywhere you go, hip-hop beating out the good ol' country tune playing next door to disco rock. There are street vendors and police on horses and all sorts of promoters walking around. You are within 100 square feet of entertainment at any given spot in the city. With nearly two thousand bands participating in just four days (and that's the amount on the official calendar... who knows how many play unofficially,) there is barely room to house them all, so every bar opens its doors to live music and even offbeat places, such as the church on Seventh Street, get involved as well.

SXSW, or "South By" to regulars/locals, has been in our lives for all of our time here. Eight years ago when Peyton bought this three bedroom/two bathroom house he began participating in the group that hosts international bands. It made perfect sense: they get free shelter at a time where available hotel rooms are like flying pigs and the host gets wristbands for all housemates. He had the space, the time, the love for music, and the urge to party.

This year's band, Still Corners from London, will be my third. As exciting as it is, it's a lot of people, which means a lot of beds. Beyond this group of six we are also housing two friends from Baltimore and another from London. So this weekend was busily spent preparing for their arrival, which is T-minus 1 hour. Peyton is still scouring a leaky air mattress, I've just finished vacuuming, and then we will just wait and enjoy this hour of silence before four days of craziness begin.

Usually I try, albeit unsuccessfully, to relax and soak in my spring break weekend before guests arrive. This one was no exception, though through the activity and work I did get enjoyment in the final product and that glorious tired feeling deep in my bones as I hit the bed at night. It started off with a sharp downturn: we gave Clementine back to the shelter. It was time. She was a grown up puppy ready to find her forever home. And even though my head knew all the reasons why we couldn't keep her sweet self, my heart wouldn't have it. It knew she was special and didn't want to let go. It hurt. I cried. I sniffed her little toy frog as it came out of the dryer and missed her furry munchkin self. But sometimes smarts need to beat out hearts, and deep down I know we made the right choice.

So, with this lovely start to the weekend we had to keep our minds off of the lack of pee on the floors, chewing on our legs, escapes out of the back gate, etc. So we worked. We worked on the garden and the bedrooms and the office and the front yard. We worked on cleaning all surfaces we could find and cooking up yummy meals to fuel our working selves. We worked with music and without, with laundry detergent and vinegar spray, with a white cat that came in the door a dirty grey. And we feel good. We are ready for the onslaught of people in forty-five minutes and for the first year are not tearing around the house tidying up just to make the place semi-presentable. Not saying that we should create puppy heartbreaks every year, because my emotions just can't take that, but it did help keep me on track. That and the fact that I would get to blog about our progress! Let me warn you, there were no major overhauls or much money spent, so it might not be as monumental as I've made it out to be. But it's livable and we've done well with what we had. So here are some pictures to show you the slight transformation that's happened these past 72 hours.

LIVE THE MURRAYED LIFE